If users have problem generating xhorse super chip xt27 with vvdi key tool max pro, error “Chip conversion failed”. Here is the solution.

Solution:
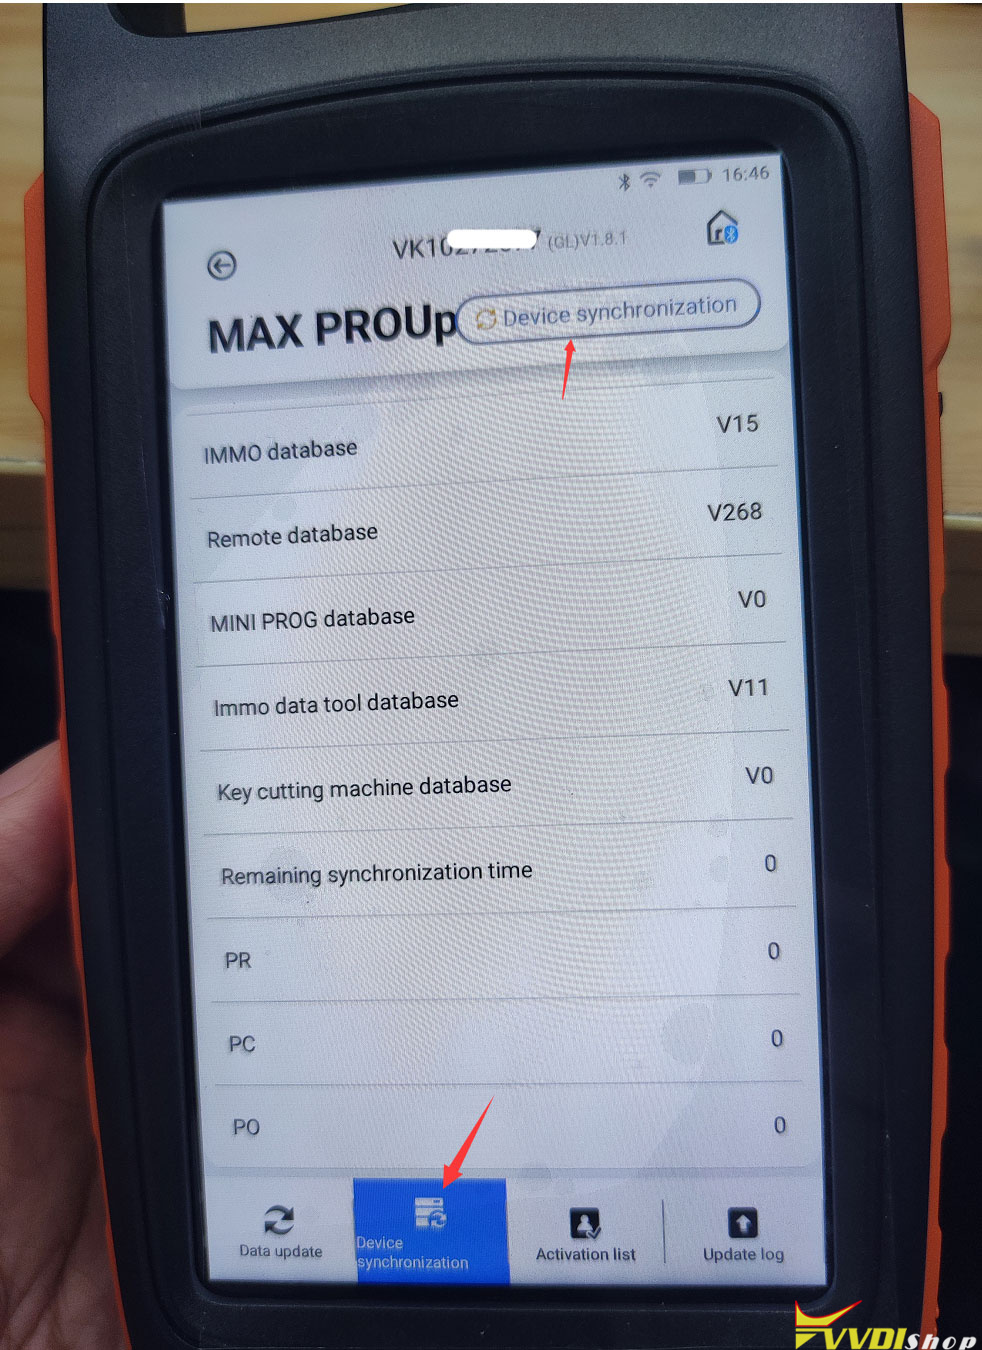
in Key Tool Max Pro, go to Update-> Device synchronization
Sync your device and try again.

Xhorse VVDI Tools, VVDI2, VVDI MB, VVDI Prog, VVDI key tool, VVDI BMW etc software & firmware download, update and technical support from vvdishop.com.
If users have problem generating xhorse super chip xt27 with vvdi key tool max pro, error “Chip conversion failed”. Here is the solution.
Solution:
in Key Tool Max Pro, go to Update-> Device synchronization
Sync your device and try again.
Xhorse vvdi prog programmer software released to V5.2.0 on Sep. 29th, 2022.
VVDIProg v5.2.0 (2022-09-29)
* This version DON’t need update
firmware
+ Add D78F0400,
D78F0401,
D78F0402,
D78F0403,
D78F0410,
D78F0411,
D78F0412,
D78F0413,
D78F0420,
D78F0421,
D78F0422,
D78F0423,
D78F0430,
D78F0431,
D78F0432,
D78F0433
options in
<2-MCU>-><RENESAS-78K>
Free download vvdi prog V5.2.0 software
https://mega.nz/file/9VsGGCKK#JLxc7QgDWBneDqERMkDHADQlCE6GS0GlJ974w8ouAA4
Problem:
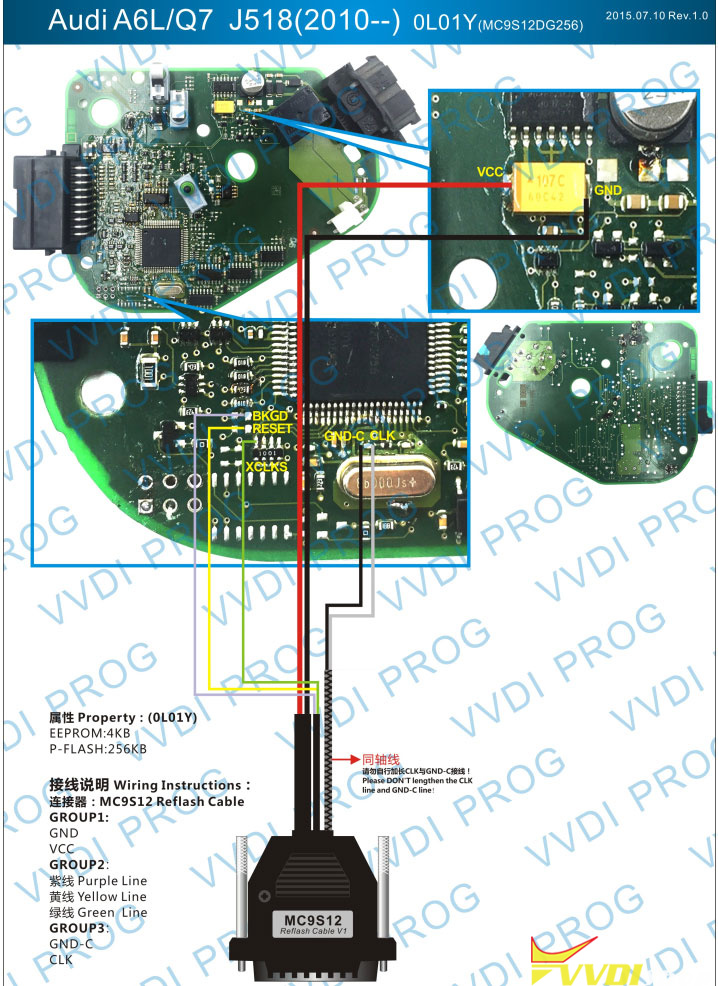
I failed to write Audi J518 ELV emulator 2010 ol01y with xhorse vvdi prog. It says chip not connected. Any idea?


Solution:
You did wrong wiring connection.
Follow correct wiring diagram here and make good connection again.
Here is the detailed instruction on how to write Audi J518 emulator with vvdi prog
http://blog.vvdishop.com/write-audi-j518-elv-emulator-256-128-with-vvdi-prog/
Information: what programmers to use and from which to stay away when doing Porsche front and rear BCM modules on Cayenne, Macan, Panamera and others.
How to back up MCU memories – D-Flash and P-Flash, read IMMO/Key/CS related information and how to adapt used BCM and ECU modules to the car.
When you are trying to read/unlock/write BCM is dead after.
MCU’s used in these BCM’s is very sensitive (Motorola MC9S12 – 1L15Y, 1N35H, 2M25J, 5M48H)
and some programmers when trying to ID/Read/Unlock/Write these MCU’s tend to corrupt or erase the memories in these MCU’s.
From what we have experienced it is the D-flash and Partition configuration that tends crash.
Here’s the user working experience:
“I have from scrap Cayenne 2014 4.2 diesel – front and rear BCM modules and both ECU’s EDC17CP44
and I also bought used BCM from Macan 2017 to play with.
BCM reading/unlocking:
Cayenne Front BCM with 5M48H MCU, rear BCM with 2N25J MCU and Macan front BCM with 1N35H MCU.
All 3 BCM modules i successfully read with Xhorse VVDI Prog. I removed the diode, 0 ohm resistor,
made the cut to crystal connection and i prefer to desolder the crystal too and 12V power supply to programmer connected.
It had no problem reading the backup of Dflash and Pflash. It did the UNLOCK function without problem.
From there is started to experiment what could be the reason for corrupting these memories.
Using VVDI Prog i used LOCK function to lock back these MCU’s where locked byte is 7D (FE for unlocked).
I have Autel IM608 with XP400Pro programmer and I tried to use that for reading these BCM’s. 2M25J was OK. 5M48H was OK. 1N35H – DEAD.
Autel could not do the backup of the 1N35H, it was unsuccessful unlocking the MCU. After that VVDI Prog could not unlock it too because something in that MCU was already corrupted by Autel programmer.
Had to use “Force Unlock” with VVDI Prog and it worked but Dflash was already wiped, partition config was wiped and Pflash was seriously corrupted.
So i revived that 1N35H memories with what i had backed up before, did the LOCK again and tried again with Autel.
Autel killed it again. I don’t know about other people experience but mine Autel XP400Pro is a “No GO” fot 1N35H MCU.
I am not saying VVDI Prog is the golden tool because some people using VVDI Prog have killed the BCM’s.
For example i tried to read the 1M35H and 5M48H mcu with VVDI Prog but 12V power supply disconnected – it did not read anything. But it also killed these memories like Autel.
Maybe Autel has bad power delivery to MCU where 5M48H tends to survive but 1N35H is way too sensitive and dies.
Immo/ECU/BCM CS:
Since i have both BCM’s and ECU from the same car i did some research on IMMO CS information.
These are only my findings and I have no idea but maybe it can help to adapt used module to the car for someone using this info.
ECU is EDC17CP44 like VAG cars i tried to use VVDI2 to calculate CS from eeprom and flash and it worked.
.jpg)
How-to: Land rover Discovery 3 HU101 blade all keys lost using xhorse vvdi prog + vvdi key tool max. vvdi prog+ vvdi2 will do it more easier. But key tool max is the small money maker.
Step 1: Read immo data
Step 2: Make dealer key
Step 3: Write back dump
Step 4: Program remote
Step 1: Read immo data with vvdi prog
Remove immobilizer module

Connect CEM with vvdi prog follow the wiring diagram


Read and save immo data
Upload immo data to i.xhorse.com online database


Step 2: Make dealer key
In key tool max, go to Special Function-> Immo data Tool-> Local File
Download CEM data uploaded in step 1


Then go to Land rover-> Discovery 3


Select a used key position to write key
If use vvdi super chip, don’t need to write back eeprom.
But here we use original chip and need to program remote, so we have to write back dump.


Make dealer key successfully
Save new key data
Step 3: Write back data
Upload the new key dump to File management


Then visit i.xhorse.com, download new key data to PC


Write back new data with vvdiprog programmer

Reinstall CEM module back to vehicle
Step 4: Program remote
The key now can start vehicle
We program the remote control with obd programmers, the cheapest option is the xtool x100 pro.


Done.
http://blog.vvdishop.com/xhorse-vvdi-key-tool-max-discovery-3-akl-via-dump/
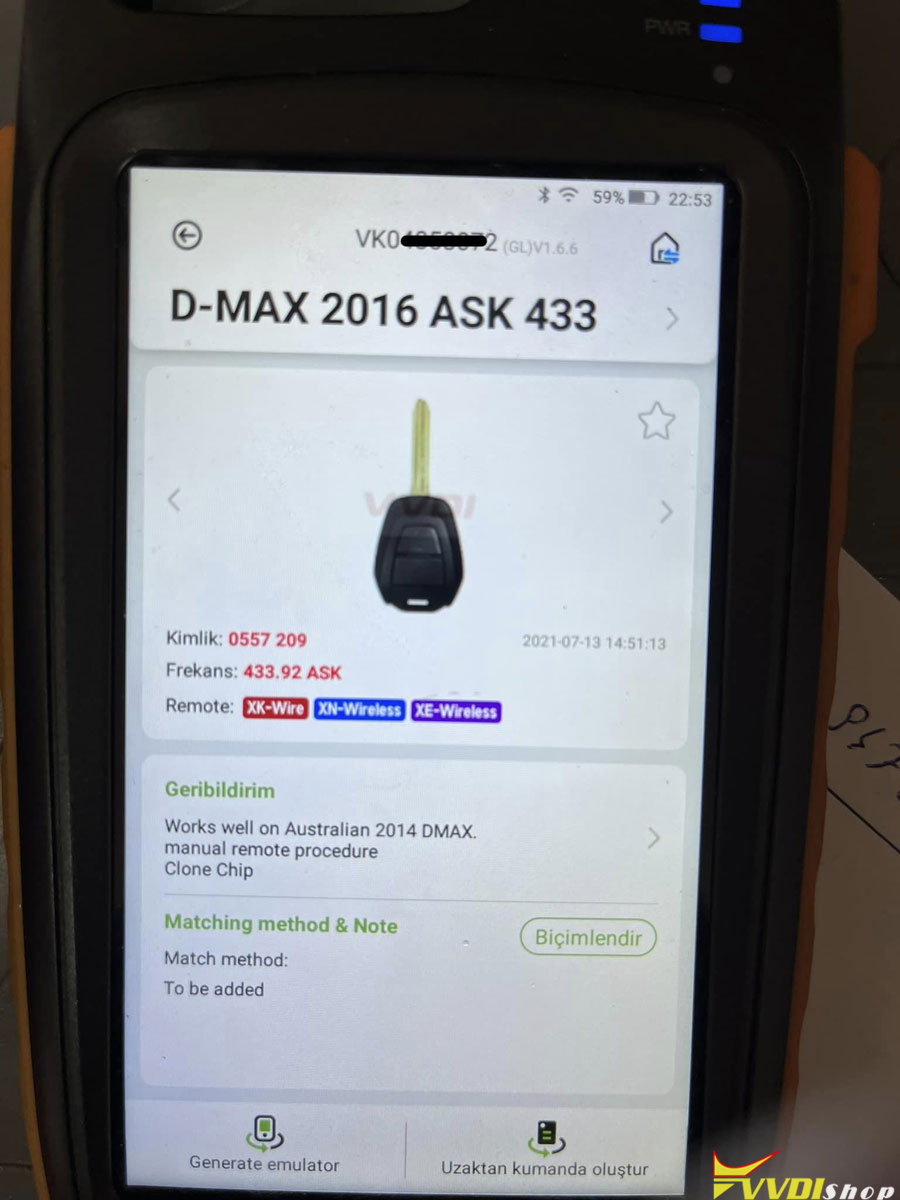
Today i have done a 2013 Isuzu D-Max with xhorse key tool max + mini obd tool.
First generate xhorse series remote with super chip.
Encoding remote (program remote) with mini obd tool.
The process is completed.


Generate remote under D-MAX 2016 ASK 433MHz option.
We’re going to show how to reset a Suzuki Alivio SRS airbag module with Xhorse VVDI PROG Programmer on bench. Actually easy to be done in 2 minutes. Let’s see how to do.
Follow the connection diagram to connect airbag module.
Open VVDI Prog software to select:
Type: 7-AIRBAG
Brand: Suzuki
Chip: ALIVIO-SRS
.jpg)
Let’s read D-FLASH at first.
Reading finish.
Save D-FLASH data file.
.jpg)
.jpg)
Next, open the modified file in computer to be able to write.
Click “Write”.
Continue to write? Yes
Writing success.
.jpg)
.jpg)
Finally, we’re going to verify a file.
Click “Verify”.
Check success.
Very perfect. It tells us that it has been a success.
.jpg)
Here we have finished a reset for Suzuki airbag module with VVDI PROG.
Problem:


CNVss to Vcc1 (should be done thru programmer adapter)
P50 (WRL (CE) pin 65 on M32C 144pins version) to Vcc1
P55 (HOLD (EPM) pin 54 on M32C 144pins version) to Vss
this should be sufficient, if not P85 (NMI pin 24 on M32C 144pins version) to Vcc1
Depending on programmers all Vss should be connected togehter ad all Vcc1=Vcc2 connected together
VVDI Prog is not the best tool to read this mcu if not worked, try with orange5 or new xprog 6.12.
How-to: program a spare key on Audi A8 year 2012 with xhorse vvdi2 vag and keydiy remote.

Procedure:
Let’s move to the details.
Turn on the ignition switch with original key
Auto connect type A3/TT/R8
Select type A3/TT/R8

Read EEPROM and Save


Read Immo data and save


Select Make dealer key
Select Audi brands, press Next


Select Add key
Add key succeed


Turn ignition on with the new key
immo indicator doesn’t go off, remote not working


Go to Xhorse vvdi2 Learn key function
Go to Key Learn-> Remote Key Adaptation-> BCM key remote adaptation
Start learning remote control


Turn off key, press UNLOCK in 15 seconds for each key
Learn remote control completed

http://blog.vvdishop.com/add-audi-r8-2012-spare-key-with-xhorse-vvdi2/


