12/16/2020

VVDI Mini Key Tool Modify Smart Key Button Distance

 How to use Xhorse VVDI Mini Key Tool to modify smart key button data? Locksmiths may need the tip when making a smart key. Here is the procedure with VVDI Mini Key Tool, it is suitable for VVDI Key Tool Max as well.

VVDI Modify Smart Key Button Distance 1


Procedure

  1. Go to main menu after connecting with VVDI Mini Key Tool.

Vehicle remote >> Chrysler >> All remotes >> Chrysler KeylessGo ID46 433M

VVDI Modify Smart Key Button Distance 2


  1. Modify button-distance >> Read

Smart key data will come out after press “Read”. If we found the “Lock” button is contrary to “Trunk” button, press them to correct the data.

VVDI Modify Smart Key Button Distance 3


Modify “Lock” button from 2 to 4, press “OK”.

Modify “Trunk” button from 4 to 2, press “OK”.

VVDI Modify Smart Key Button Distance 4


We can also modify the “Frequency” and “Baud1”.

It is benefit for the situation when the remote distance is too short to work well, it would be work. For example, the frequency is 433.899, we edit it from 433.899 to 433.919, and we edit baudi1 from 7800 to 7600. When the keyless go function does not work well, try to adjust baud2 from 7800 to 7700 either.

VVDI Modify Smart Key Button Distance 5


  1. Write data to smart key

Press “Write” button to save the new remote control distance and sensing sensitivity data to smart key.


Write OK. It is done, no need to match the vehicle again.

VVDI Modify Smart Key Button Distance 6


This is a tech tip of fine tuning smart key remote control distance and sensing sensitivity data with VVDI Mini KeyTool.


Good luck!


https://www.vvdishop.com/

12/14/2020

VVDI Remote Charge Battery Test Review

 Questions

  1. Does the vvdi mini key tool remote charge battery function work?
  2. Can I use the function with Xhorse VVDI Key Tool Max programmer?
  3. What vehicle models dose the function work for?


remote charge battery 1

remote charge battery 2


Answers

  1. Yes, it can work normally.
  2. Yes, remote charge battery function can work well with VVDI Mini Key Tool and VVDI Key Tool Max.
  3. It is used for BMW old type EWS original rechargeable keys.


Remote charge battery test review


Works on VVDI Key Tool Max

“It is quite easy, the function can work without a problem. I have tried it on the VVDI Key Tool Max and it did work! It gave 10 minutes for charging.”


Works on VVDI Mini Key Tool

“I am also tried it on a VVDI Mini Key Tool, which did a few in the past months. It works fine. Today I replaced the battery on a BMW CAS diamond key. Measures 2.80v., it takes 5 minutes in VVDI Mini Key Tool, 3.20v.


Thanks to VVDIshop customer.

https://www.vvdishop.com/

12/07/2020

VVDI Key Tool Max “Server exception” Solution

 Question:


I was failed to connect my Xhorse VVDI Key Tool Max with VVDI MINI OBD Tool. It prompted “Server exception” error, the “Bluetooth” and “Automatic connect” button have been already turned on, but MINI OBD Tool is still disconnected.


Why? Please help me!


VVDI Key Tool Max “Server exception”


Vvdishop solution:


Please turn off the “Automatic connect” button, upgrading both firmware of Key Tool Max and MINI OBD Tool to latest version.


Connection error was fixed! It is successful to connect 2 devices now.


Thanks to Vvdishop engineer.

https://www.vvdishop.com/

12/02/2020

VVDI Mini OBD Function Not Available Problem

 Question:

Hi, I use VVDI MINI OBD Tool for the first time, but when I tried to make vehicle diagnostic, the following messages popped up:

“Function not available, coming soon”

“Function not activated! Please go to self service or contact with dealer to activate ”

vvdi-mini-obd-function-not-activated-1

vvdi-mini-obd-function-not-activated-2


How to solve this problem? Please help me!


Solution:

The reason is that the vehicle diagnostic function is not activated now, and it is still under development. For the moment, only IMMO programming is available. There’s no diagnostic in Xhorse MINI OBD. In the future, Xhorse engineers will open this function.

12/01/2020

Xhorse VVDI Mini Prog Function Review

 What is Xhorse VVDI Mini ProgIt is a professional smart programming device featuring solder-free program.

Today, I’ll show you its standard configuration and how its working interfaces looks like.

Now, I have the original package of Mini Prog in my hand. So you can see from its outer package, it’s just like a pen, that’s why we sometimes call it a programming pen.


This is Mini prog. The color is a little bit from what we can see on the cover page, but it’s still Okay and it’s very lightweight and very comfortable to hold.

Look at the front side of the mini prog. There are 3 buttons. The first one is on and off button, we can start the device, and the second is the menu button to control the device, and there is a led button, you can turn the light on.

vvdi-mini-prog-function-1


This is the led screen, showing the working status of mini products.

vvdi-mini-prog-function-2


Now, I’m going show you the working interfaces of Mini Prog.


To operate Mini Prog, you have to download xhorse app on your smartphone, and access xhorse app, choose “MINI PROG” button, then click “select” >> “VP02766511”, and then choose the language you want.

vvdi-mini-prog-function-3

vvdi-mini-prog-function-4

vvdi-mini-prog-function-5


Function Overview:


  1. EEPROM and FLASH


“EEPROM and FLASH” can read EEPROM from different manufacturers.

Here, we choose “ATMEL”>>“AT24CXX” >>“AT24C1024(pressure)”, and it will show which adapter you should use.

vvdi-mini-prog-function-6

vvdi-mini-prog-function-7

vvdi-mini-prog-function-8

vvdi-mini-prog-function-9


This is pin header 3. Connect the header to the Mini Prog, then you can directly read and write data.

vvdi-mini-prog-function-10


  1. Immo


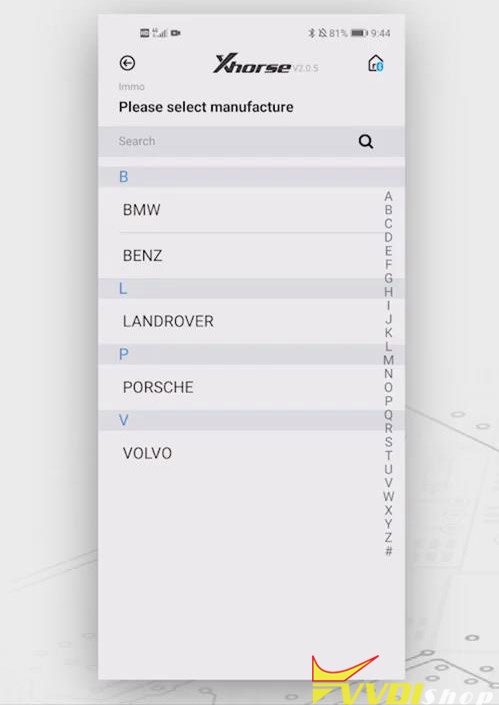
Now, click “Immo” button, then we can see it supports several cars like BMW, Benz, Land Rover, Porsche and Volvo.

Let’s click “BMW”>>“BMW”again, we’ll see that we can read these many modules.

Let’s choose “CAS4+(5M48H)-BACK(ADAPTER)”, we’ll see the info. about the operations, namely, which adapters you should use and the connection diagram, usually you need to clip the adapter to the module.

vvdi-mini-prog-function-11

vvdi-mini-prog-function-12

vvdi-mini-prog-function-13

vvdi-mini-prog-function-14

vvdi-mini-prog-function-15


  1. Instrument


As for “Instrument”, so far, it supports “HONDA”, “HYUNDAI” and “KIA”. Let’s choose “KIA”>>“K5MB91F067BS(ADAPTER)”, and it will show info. of the adapter and the connection diagram.

vvdi-mini-prog-function-16

vvdi-mini-prog-function-17


  1. ECU


About the “ECU”, it has the same interfaces as other modules.


Let’s click “BMW”>>“BMW” again >>“E_ENGINE_MEVD1724(N20)”, then we can the info. of the adapter and the connection diagram.

vvdi-mini-prog-function-18

vvdi-mini-prog-function-19


  1. Read ECU with CAN

The last icon, “Read ECU with CAN”you can read ECU without dismantling.

Select “AUDI”>>“AUDI” again>>“EDC17CP54”, then the info. of the adapter and the connection diagram can be seen.

vvdi-mini-prog-function-20

vvdi-mini-prog-function-21

vvdi-mini-prog-function-22


Video reference:

www.vvdishop.com


How to use VVDI Key Tool Plus Pad to Transfer Data?

 Please be informed: Xhorse VVDI Key Tool Plus Pad cloud disk has the function of transferring data.

Here are the detailed steps (take JLR KVM module as an example):


What we’ve connected is Land Rover’s KVM module.

Ⅰ.Decode the chip

  1. Now, please click “Programmer”>>“Immo”>>“Land Rover”>>“LANDROVER”again>>“RFA Encrypted(MC9S12XEQ384)”>>“More functions”>>“Unlock”>>“Confirm”>>“Start”>>“Continue”.

vvdi-key-tool-plus-transfer-data-1

vvdi-key-tool-plus-transfer-data-2

vvdi-key-tool-plus-transfer-data-3

vvdi-key-tool-plus-transfer-data-4

vvdi-key-tool-plus-transfer-data-5

vvdi-key-tool-plus-transfer-data-6

vvdi-key-tool-plus-transfer-data-7

vvdi-key-tool-plus-transfer-data-8

vvdi-key-tool-plus-transfer-data9


Ⅱ.Read the data

1.When the chip has been decoded, then we can start to read “D-Flash”, then rename and save the D-Flash file.

vvdi-key-tool-plus-transfer-data-10

vvdi-key-tool-plus-transfer-data-11

Read “EEE”, rename the EEE file and save it.

  1. Read “P-Flash”, rename the P-Flash file and save it.

Ⅲ. Transfer the data

After finishing reading the data, then we can transfer the data freely.

For transferring data to the computer, we need to:

  1. Open a web page and enter the website address “xhorse.net.cn”, then a QR code will appear.
  2. Click “Programmer” of the vvdi key tool plus, and choose “Data edit”>>“Scan code&login”, then scan the QR code on the computer and login.

vvdi-key-tool-plus-transfer-data-12


  1. Enter “Local document” and upload the file we want, say, D-Flash file, the EEE file or the P-Flash file we’ve read just now, to the cloud disk.


  1. Refresh the web page, then we can see D-Flash file, the EEE file and the P-Flash file. If we want to download them to the computer, we can choose them and click “download”.

For transferring the data to the tablet, we need to:

  1. Upload the document of the computer, say, “AAAAA” file, to the cloud disk.
  2. Click “My data” of the tablet, then we can see “AAAAA” file.
  3. If we want to use the file, then we can download it to the tablet.


www.vvdishop.com