8/24/2026

Xhorse BCM2 Solder Free Adapter V2 Review

I’ve used the Xhorse BCM2 Encrypted Solder-Free Adapter on several BCM2 jobs. It’s a practical bench setup for encrypted BCM2 read/write work on Volkswagen, Audi, Porsche, and Lamborghini, and it works with both Multi-PROG and VVDI Key Tool Plus.


Who Should Buy It?

Good fit for:

  • Technicians regularly working on VAG BCM2 modules.
  • Locksmiths who need BCM2 bench read/write capability.
  • Workshops that prefer solder-free connections.


Not the best fit for:

  • Shops that only see BCM2 occasionally.
  • Beginners with no BCM2 bench experience.
  • Technicians who don’t need BCM2 read/write work.

Xhorse BCM2 Solder Free Adapter V2 Review 1

Xhorse BCM2 Solder Free Adapter V2 Review 2

Xhorse BCM2 Solder Free Adapter V2 Review 3

Real Workshop Notes

The Connection

The connection is pretty simple once you have the right BCM2 version. The adapter locks onto the required points and stays in place well.

The kit has two adapter boards and two cables for different BCM2 versions. I like the setup because there’s no soldering involved.

Xhorse BCM2 Solder Free Adapter V2 Review 4

Xhorse BCM2 Solder Free Adapter V2 Review 5

Reading

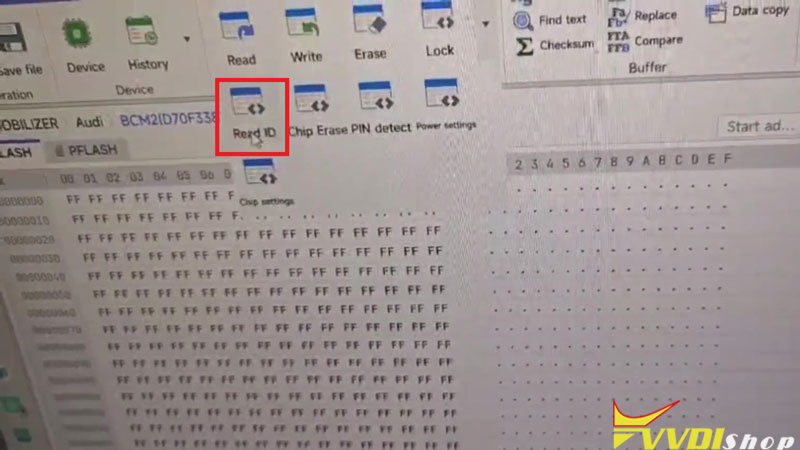
I usually do a Read ID first. If the CPU is recognized correctly, I move on to D Flash and P Flash.

D Flash is relatively quick. P Flash takes longer, but the actual reading process was stable in my testing.


One Thing to Expect

The BCM2 needs to be unlocked again for each operation. It doesn’t stay unlocked after the first decryption.

That adds some time, especially if you’re doing several operations. I wouldn’t permanently unlock it just for convenience because that means erasing the data.


Overall

Once the correct adapter and protocol are selected, the workflow is straightforward. Writing follows basically the same approach as reading.

Xhorse BCM2 Solder Free Adapter V2 Review 6

Xhorse BCM2 Solder Free Adapter V2 Review 7

What I Liked

  1. Stable fit: The adapter stays firmly on the BCM2 connection points.
  2. Solder-free: No direct soldering to the board.
  3. Two setups: Covers different BCM2 versions.
  4. Read ID: Useful for checking the connection before a full read.
  5. MultiPROG&Key Tool Plus: Good flexibility if you already use either platform.


What Could Be Better

  1. Repeated unlocking: Adds extra time between operations.
  2. P Flash speed: Larger data takes noticeably longer to read.
  3. Correct identification is important: The BCM2 version, CPU, and protocol all need to match.
  4. Some bench experience helps: It’s not completely plug-and-play for someone new to BCM2 work.


Would I Buy It Again?

Yes. After using it on multiple BCM2 jobs, I’m comfortable keeping it in the bench setup. The BCM2Solder-Free Adapteris stable, solder-free, and easy to work with once the correct configuration is identified. The repeated unlock step is the main thing to account for, but it hasn’t been enough to put me off using it.


www.vvdishop.com

8/13/2026

VVDI Key Tool MIDI Adds 2025 Chevrolet Aveo Key

For this 2025 Chevrolet Aveo, we used the Xhorse VVDI Key Tool MIDI to add a duplicate key. No code is needed on this model—the key can be matched directly through the IMMO menu.


Key Programming

  1. Go to Immo Programming >> SAIC-GM-Wuling >> Immo System >> Xingchen >> Key Count. The current key count is 2.
  2. Select Key Programming, insert the new key to be matched, and turn on the ignition.
  3. The VVDI Key Tool MIDI programs the key in less than a minute. The screen shows “The current key programmed successfully” followed by “Matching completed.” Up to 4 keys can be matched.
  4. Turn off the ignition and wait for more than 30 seconds.


Verification

Turn the ignition back on and check the new key. The remote control works, and the engine starts normally. The duplicate key is ready to use.

VVDI Key Tool MIDI Adds 2025 Chevrolet Aveo Key 1

VVDI Key Tool MIDI Adds 2025 Chevrolet Aveo Key 2

VVDI Key Tool MIDI Adds 2025 Chevrolet Aveo Key 3

VVDI Key Tool MIDI Adds 2025 Chevrolet Aveo Key 4

VVDI Key Tool MIDI Adds 2025 Chevrolet Aveo Key 5

VVDI Key Tool MIDI Adds 2025 Chevrolet Aveo Key 6


8/10/2026

Read Geely Coolray 2024 Dashboard with Xhorse Multi Prog

It’s a Geely Coolray 2024. The owner needed to slightly adjust the mileage to maintain the dealership’s warranty (they had adjusted it before the maintenance).

The panel looks like this.

Read Geely Coolray 2024 Dashboard with Xhorse Multi Prog 1

First, remove the instrument panel. To do this, pull the visor up with one sharp movement, unscrew the 12 screws, and then remove the panel. The rear panel cover is secured with clips and 4 screws.

Read Geely Coolray 2024 Dashboard with Xhorse Multi Prog 2

Read Geely Coolray 2024 Dashboard with Xhorse Multi Prog 3

EEPROM chip which contains the mileage.


He read the m24c08 microcircuit using Xhorse Multi prog programmer, but it’s necessary to desolder it; you can make a mess with a clothespin.

Let’s remove the dash panel, lower the fuse box, and unscrew the four BCM mounting bolts. It’s on the left pillar at the top of the front; it contains a bunch of components. Removing it is very inconvenient. Next, we need to find something to read it with. There’s no EEPROM there; all the information is stored in the processor. The MultiProg programmer from Xhorse helped us with this. The connection is easy, but you’ll need to be handy with a soldering iron.
Read Geely Coolray 2024 Dashboard with Xhorse Multi Prog 4

He read it, sent it to the same programmer, uploaded it back to the BCM, and then re-entered it into the instrument cluster.
He put it back together, and bingo! The mileage is exactly what he needed. He ran the auto launcher through the modules, and the transmission included the mileage from the BCM.
8/09/2026

Clone Skoda Octavia 2018 Dashboard by Xhorse Multi Prog

Here comes a customer review of cloning/replacing a 2018 Skoda Octavia III MQB dashboard using Xhorse Multi Prog.

He recently purchased this dashboard.
Cluster part number: 5E0920750E.

He read the data from the old dashboard, including mileage, VIN and so on.
Then he read the data from the new dashboard and transferred it.

After transferring all the data from the old dashboard to the new one, he installed it in the car.

Everything was done using Xhorse Multi Prog programmer. When he updated the immobilizer data, everything transferred, including the VIN information, all the codes, and the key information.
So, the long-awaited dashboard finally accepted the keys. Just need to fix a couple of errors and it’s ready.

Clone Skoda Octavia 2018 Dashboard by Xhorse Multi Prog 1

Clone Skoda Octavia 2018 Dashboard by Xhorse Multi Prog 2


8/06/2026

Xhorse Multi Prog Renault EMS3125 Chip Data Reading Failed

Problem:

Xhorse Multi Prog failed to read Renault/Dacia EMS3125 ECU. After connecting, the program reads the processor identification but does not read the content. The software reported a chip data reading failed error.

Xhorse Multi Prog Renault EMS3125 Chip Data Reading

Solution:

As the multiprog said, the chip is encrypted and cannot be read.
The processor is password-protected.

Xhorse multiprog cannot read this; boot mode only combiloader, obdstar or trasdata.

8/04/2026

Xhorse Multi Prog Clone GM RH850 R7F701053 BCM

 Here comes the user review of GM BCM cloning using Xhorse Multi Prog programmer.


First attempt:
BCM GM with 24c32 RH850 R7F701053
I problem with this BCM water damaged same parts numbers, so i clone eeprom 24C32 but i have all functions working
like door lock from driver\passenger side no work, driver windows no work.

Is it possible to clone RH850 R7F701053 written only CFLASH *multiprog*?
if we can clone this MCU/BCM safely without damaging the MCU?


Second Attempt:
Need to write eeprom and flash together.
DFLSH is all FF FF FF.
Cflashhave content.

Solved, only need eeprom and cflash job done.

Xhorse Multi Prog Clone GM RH850 R7F701053 BCM 1

Xhorse Multi Prog Clone GM RH850 R7F701053 BCM 2

Xhorse Multi Prog Clone GM RH850 R7F701053 BCM 3


8/02/2026

How to Connect Xhorse Key Tool MIDI with 5C 5D Adapter?

Xhorse VVDI Key Tool MIDI advanced version now also supports reading original VAG MQB49 5C/5D key data and add key without multiprog.


How to connect Xhorse Key Tool MIDI with Xhorse 5C 5D adapter?

To connect Xhorse 5C 5D adapter with MIDI, you will need an extra XNDP123 converter.

Connect Xhorse Key Tool MIDI with 5C 5D Adapter 1

Connect Xhorse Key Tool MIDI with 5C 5D Adapter 2

First of all, disassemble original key board.

Connect the key board to the 5C/5D adapter.

Connect Xhorse Key Tool MIDI with 5C 5D Adapter 3

Connect Xhorse Key Tool MIDI with 5C 5D Adapter 4

Connect Xhorse Key Tool MIDI with 5C 5D Adapter 5

Connect 5C/5D adapter with XDNP123 converter.

Connect Xhorse Key Tool MIDI with 5C 5D Adapter 6

Connect XNDP123 converter with MIDI tablet via USB cable.

Connect Xhorse Key Tool MIDI with 5C 5D Adapter 7

Connect Xhorse Key Tool MIDI with 5C 5D Adapter 8

Connect Xhorse Key Tool MIDI with 5C 5D Adapter 9

Now you can read 5C 5D key data, generate dealer key and learn key with MIDI without other devices.